Import
|
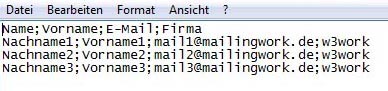
Maybe you have already collected email addresses to which you want to send a newsletter. No matter in which database these information are stored – you only need to save them in a CSV file (for example with Excel) and import them MAILINGWORK. You can pack your CSV file as a zip to accelerate the uploading of large files. That's how it works:In the first line of the table, there should be field names – first name, surname, email address etc. An example: |
|
|
|
Save the file as a file with the feature 'CSV (Comma delimited)'. Apple user: If you own an apple computer, you will have to safe the file as 'CSV-Windows'. MAILINGWORK does not run files in the Mac format. Step 1 – Import fileOn the navigation bar click on 'Subscribers' and then go to the navigation subitem 'Import'. This is the way how you get to the menu-guided import function of MAILINGWORK. First, you will have to choose the file which you want to import; |
 |
|
Then you can click 'Next'.
Step 2 – File StructureIn order to correctly import your addresses, you can adjust the parameters of the file that has to be imported in this step. Adjust 'Field Separator', 'Text Separator' and 'Character Set' until the first subscribers of your address list are shown correctly in the thumbnail. Usually, semicolon as a 'Field Separator' and no comma as a 'Text Separator' have to be used. You may check your CSV file to that effect by opening the file in an editor and differentiating:
|
 |
|
if the first line of your address file contains (as shown in the example above) the column headings, leave the item 'First line contains column headings' marked . Otherwise, if your address file starts right away with the subscriber data, unmark this option. Step 3 – Subscriber ListsChoose the subscriber list to which you want to import the addresses. Subsequently click on 'Next'. Step 4 – Field MappingNow you are asked to match the field names of your subscriber data with those of MAILINGWORK. In order to do so, please choose in the drop down menus the associations which correspond to field information displayed to the left of these menus. If there does not exist a matching subscriber field, choose 'New Field' and enter a name for the subscriber field that needs to be created. Click 'Next'.
|
|
|
|
Then you can klick 'next'. Step 5 – Type of ImportChoose one of the four in the import process available types of import: 'Add', 'Replace', 'Update', or 'Update and Add'. Following descriptions and graphics are useful for explanation: |
 |
|
Add: Add data records regardless of existing data records. |
 |
|
Replace: Delete all data records of the list and replace them. |
|
|
|
Update: Only update existing data records of the list. |
|
|
|
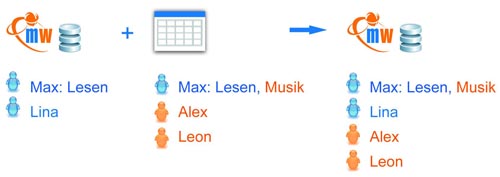
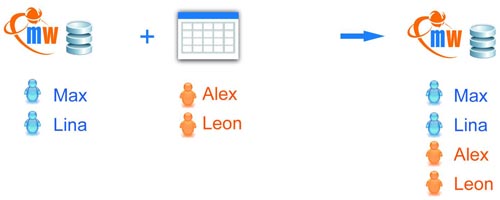
Update and Add: Update existing data records and add new ones. |
|
When choosing 'update' or 'update and add', the option 'Delete subscribers who are missing in the import file' is available. Consider the case that there are less data records that have to be updated in your import file than in the selected list. If you mark this option, all data records that do not have to be updated will be deleted from the subscriber list. Step 6 – OptionsChoose whether the imported data will be compared with the already in the system collected opt-outs. If so, decide whether the comparison is supposed to be globally or locally in only some lists. Then, all addresses which are already opted out will not be imported again. At this point, you may also add further settings to some types of import. These settings are meant for the fields that have to be updated and the identification fields (when choosing 'Add'). Otherwise, this step will be skipped. Step 7 – ImportCheck your settings for the upcoming import again. Subsequently start the import process by clicking 'Import'. Step 8 – OverviewA progress bar and corresponding system messages inform you about the progress of your data import. The message 'The Import has been successfully accomplished' points out that the data has been successfully imported to your subscriber list. In the announcement you can see how many data records have been imported altogether. In addition to that, MAILINGWORK tells you how many invalid addresses were found in the imported data records, in which lists the data was imported, and which type of import was used.
|